
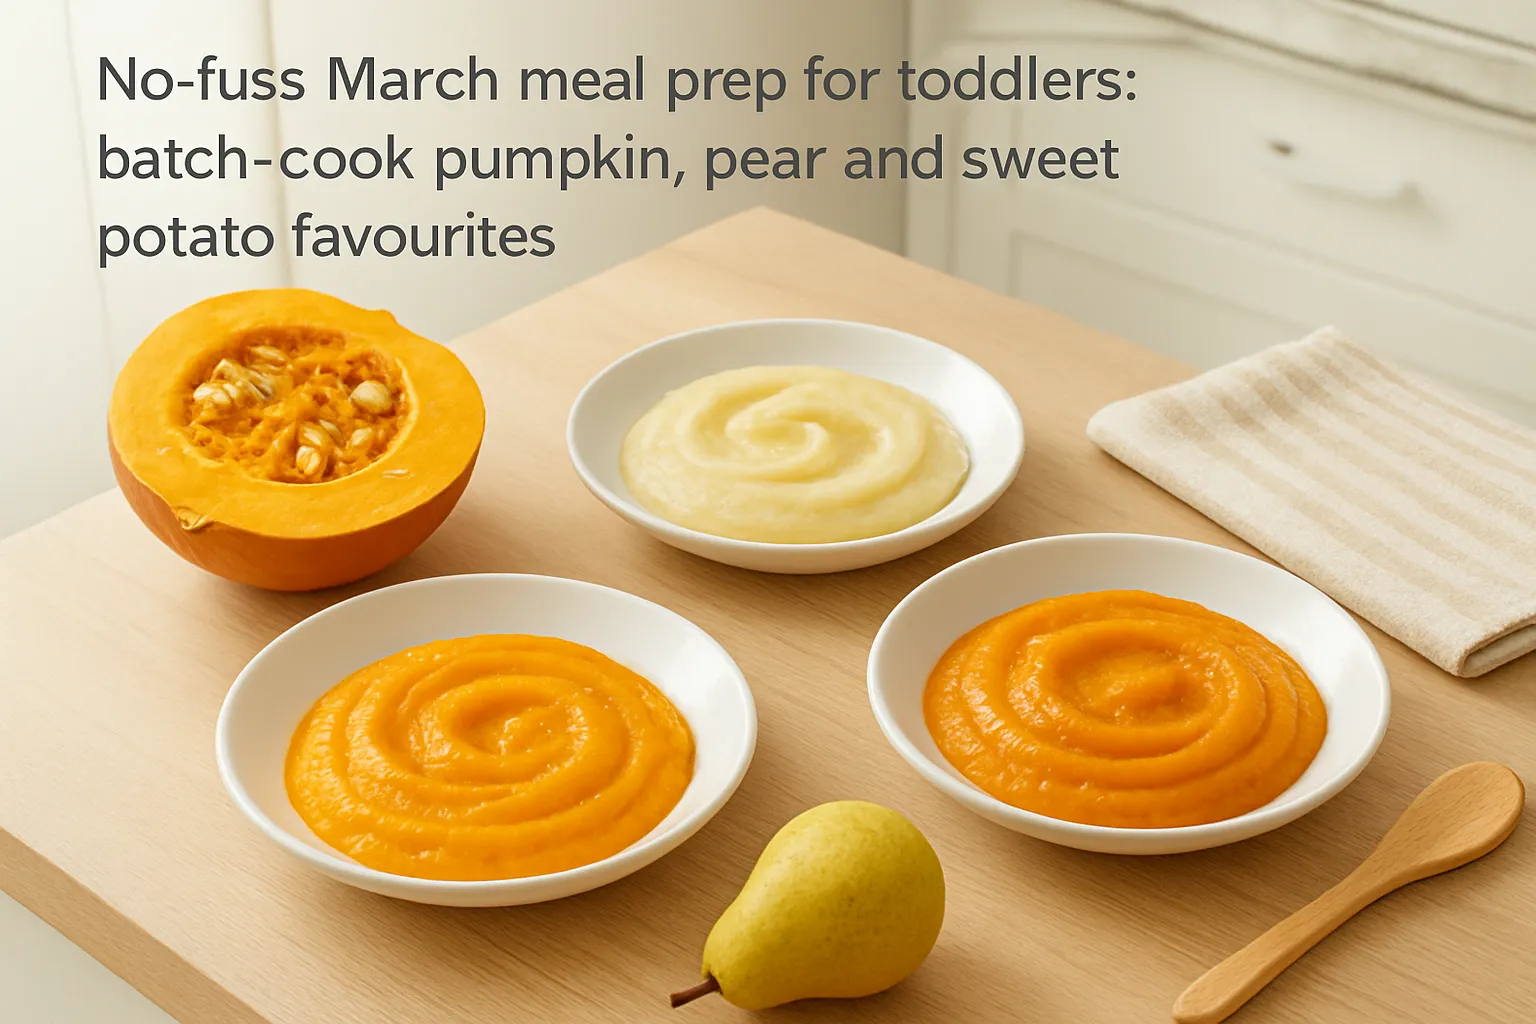
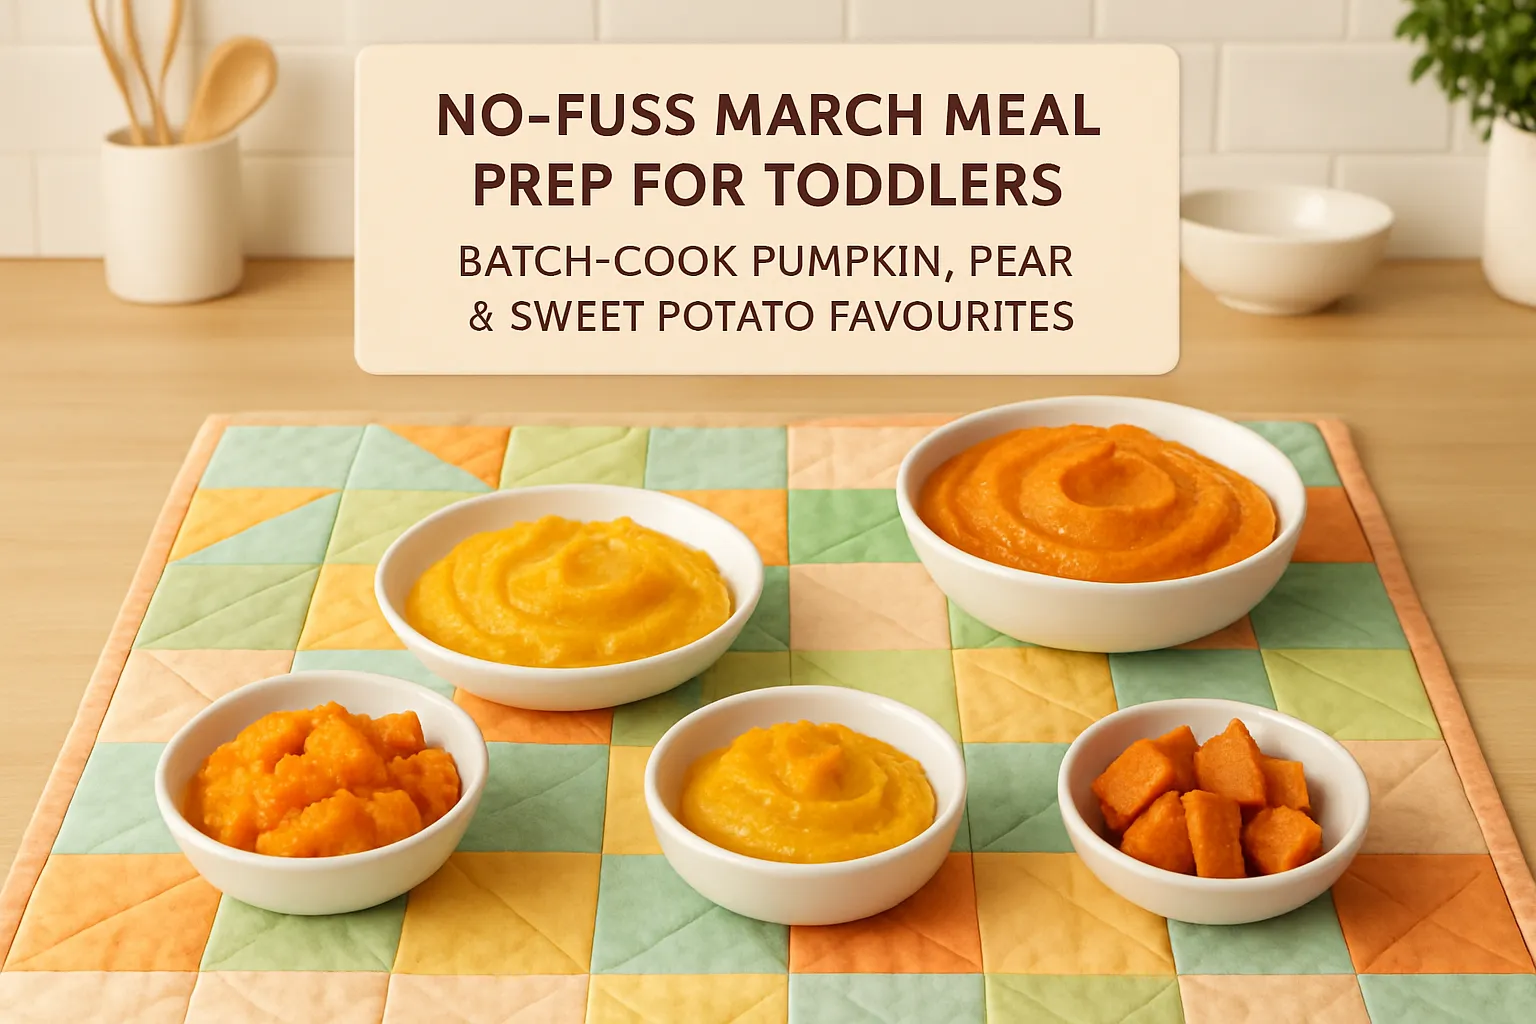
No-fuss March meal prep for toddlers: batch-cook pumpkin, pear and sweet potato favourites
Righto, a few simple rules that make batch-cooking actually feel doable, not like a full-time job. Follow these and you’ll get more done in less time, with less post-cook stress.
Before you start
- Decide how many toddler meals you want for the week. Aim for 6 to 10 single toddler portions if this is your first try. That keeps it manageable.
- Make a short menu of 2 to 3 base items to cook in bulk. Repeating a few things means less faffing in the kitchen.
- Pull out containers, trays and labels before you begin so you don’t waste time hunting mid-cook.
Must-have kit
- A couple of rimmed baking sheets, a roasting dish and one large saucepan or steamer.
- Silicone muffin tins and ice cube trays for easy portioning of purees, sauces and small mash serves.
- A set of small airtight containers or snap-lock bags for single toddler portions. 100 to 180 ml containers are a good size for toddler servings.
- Sharp knife and chopping board, a stick blender or food processor for smoothing textures, and a tea towel for handling hot trays.
Smart batch-cook workflow
- Preheat the oven, rinse and chop while it heats, then pop trays in so nothing sits cooling on the bench for ages.
- Roast, steam and simmer at the same time. While one tray roasts, use the stovetop for grains or a slow simmer pot.
- Multi-task: while something bakes, wash and portion what’s already cooked so you finish with a tidy kitchen.
Portioning and storage
- Use muffin tins or ice cube trays for small, toddler-sized portions. Pop cubes into a labelled freezer bag once frozen flat.
- Label everything with contents and the date. Put the oldest items at the front of the freezer so you use them first.
- Freeze flat where possible. Flat bags stack and thaw quickly in the fridge.
Cooling and food safety
- Cool food quickly by spreading it thin in a tray before portioning. Don’t leave cooked food out for more than two hours.
- Store leftovers in shallow containers in the fridge and freeze within a day for best quality.
- Once thawed, don’t refreeze. Reheat thoroughly until steaming hot, then cool to serving temperature and stir well to avoid hot spots.
Quick reheating tips
- Thaw overnight in the fridge for gentlest reheating. You can microwave, reheat in a small pan with a splash of water or finish in a low oven.
- For busy nights, reheat straight from frozen on the stovetop or in a covered dish in the oven. Stir and check temperature before serving.
A few gentle rules for sanity
- Don’t aim for perfection. A bit of variety and a few convenience wins are fine.
- Start small and build up. Once you’ve found a rhythm, batch-cooking will feel like the best life hack.
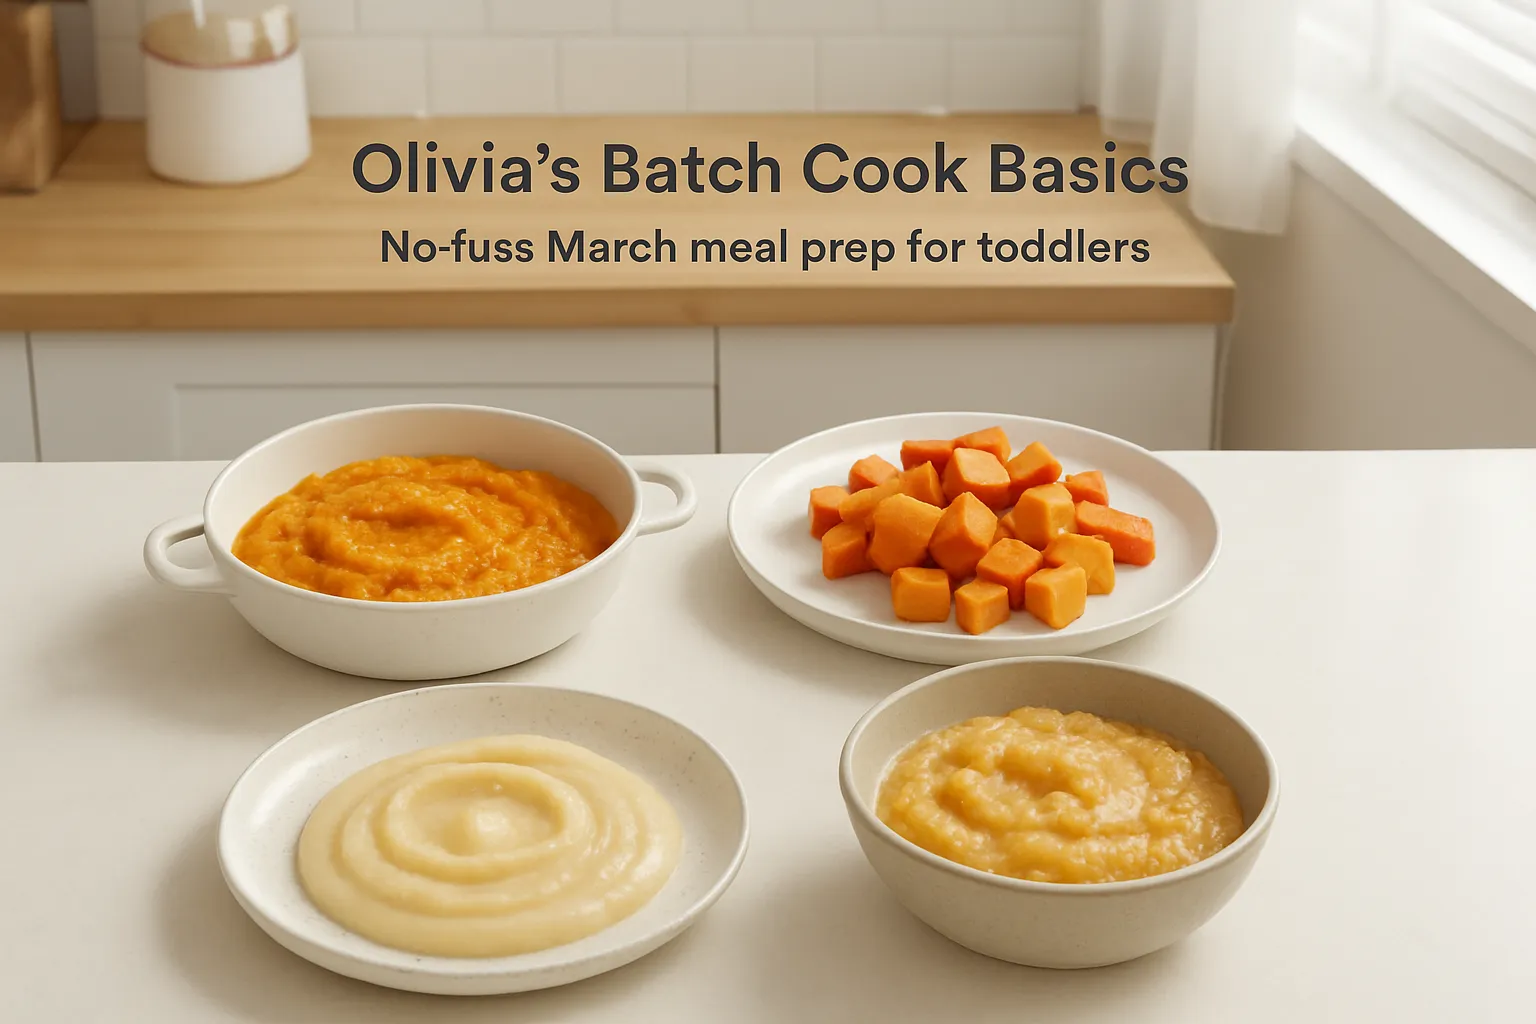
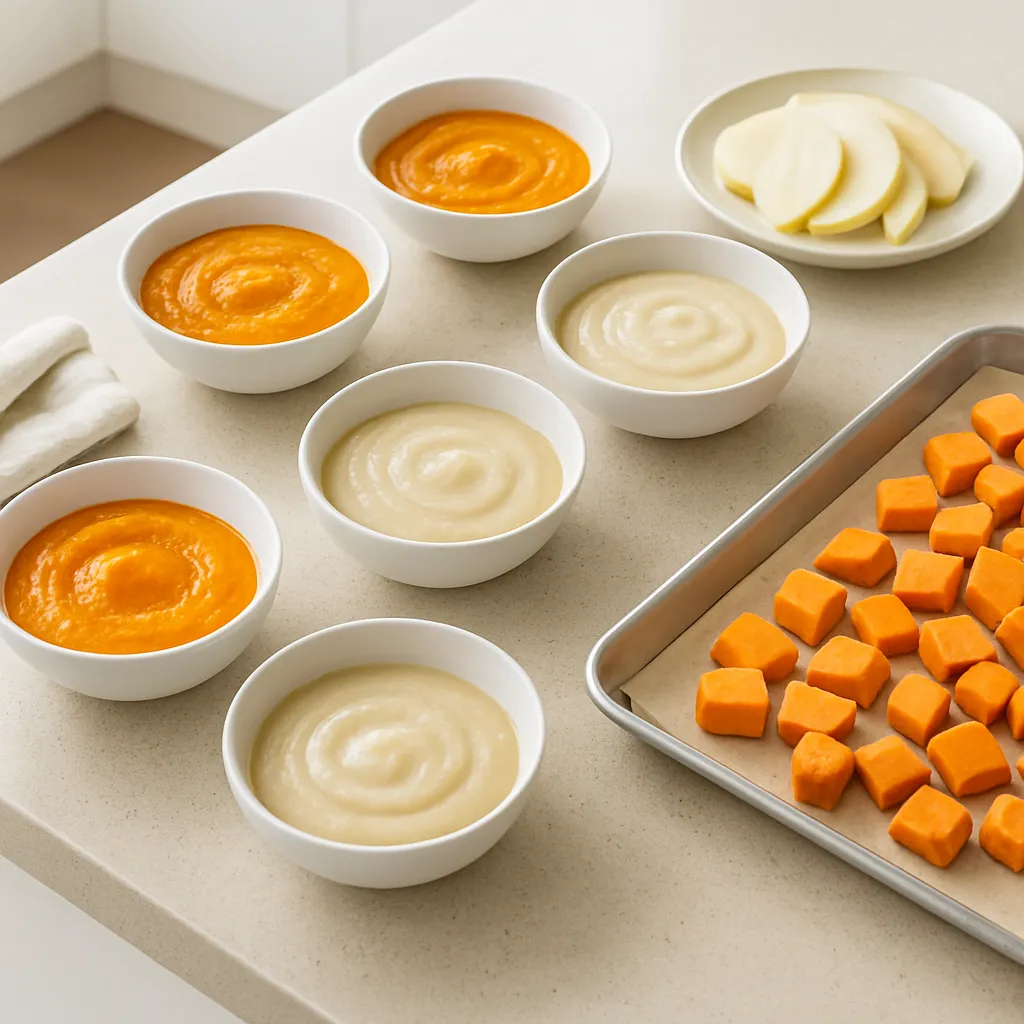
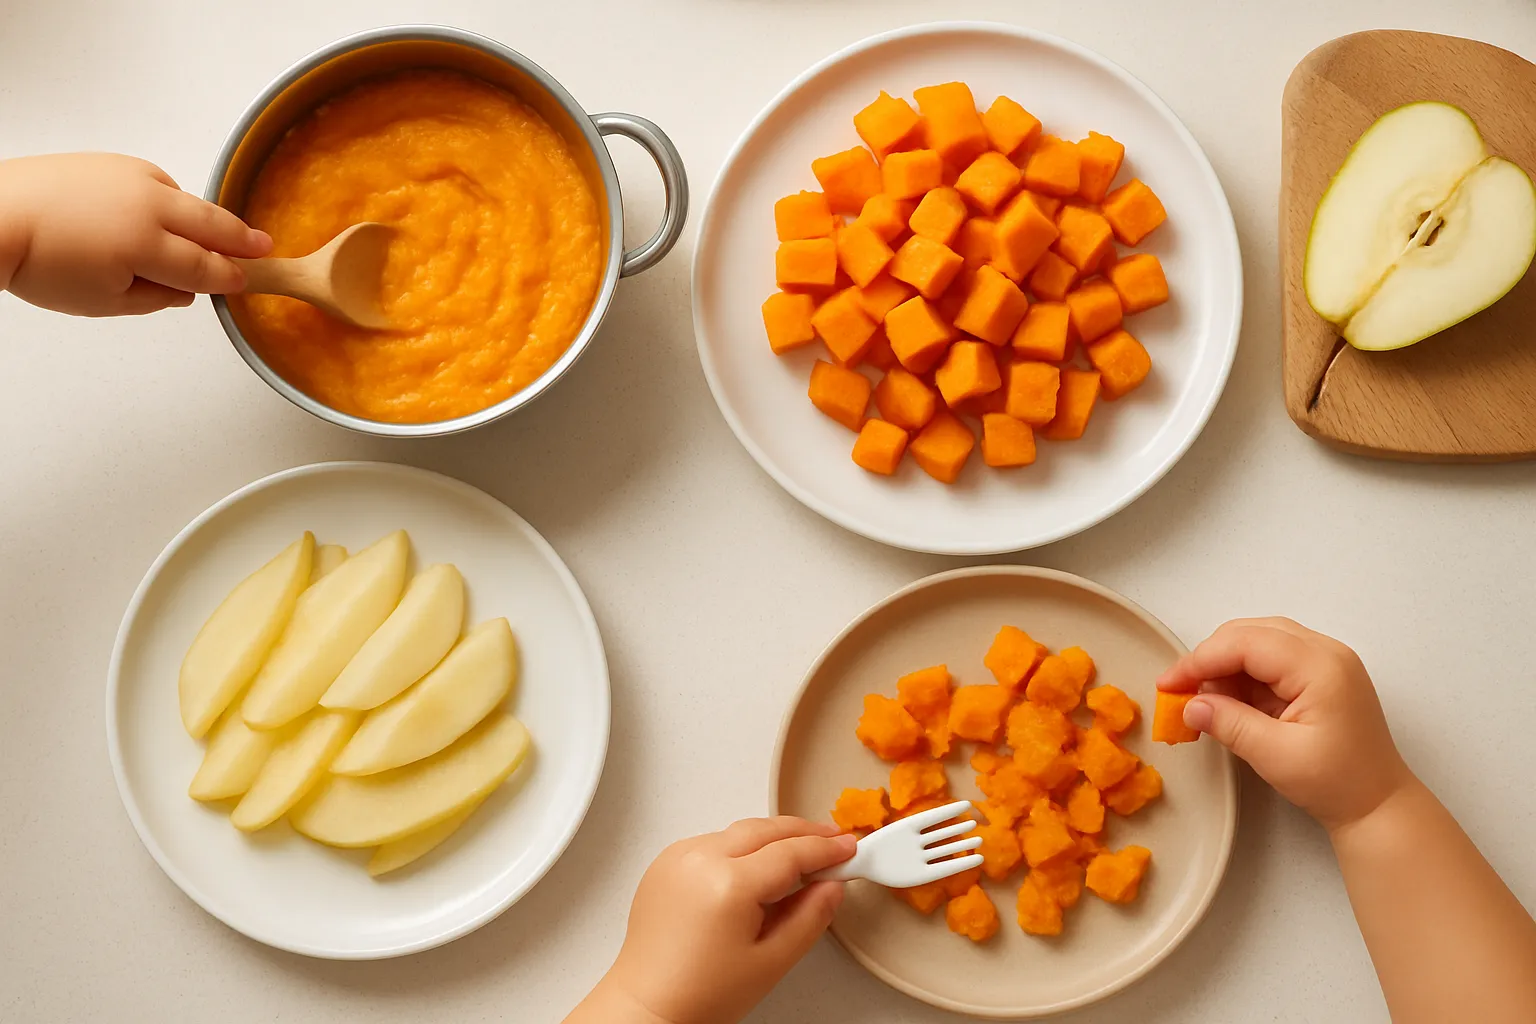
Right, these three are the dream team for toddler batch-cooking: they roast beautifully, mash or puree into everything, and freeze like champs. Here are simple ways to turn pumpkin, pear and sweet potato into a week (or month) of easy meals.
Roast-and-store basics
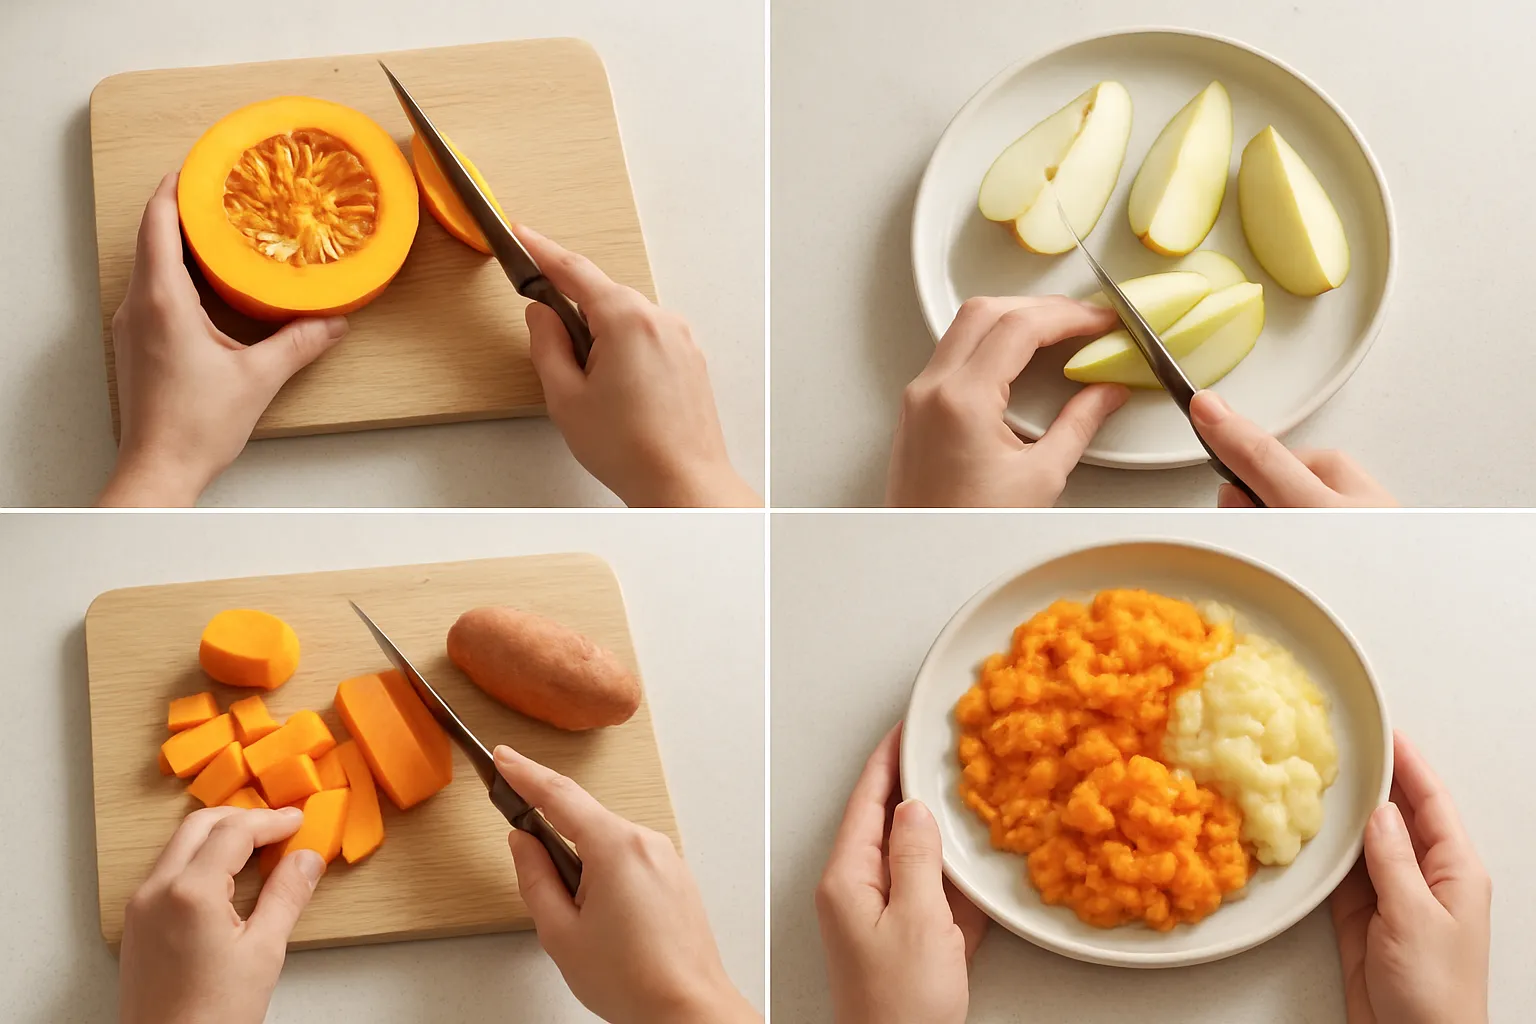
- Oven roast whole trays at 200°C. Chop pumpkin into 3 cm chunks, sweet potato into similar-sized chunks, toss lightly with oil and roast 30 to 40 minutes until very soft. Pears are best steamed or baked whole until just soft, about 15 to 20 minutes depending on size.
- Cool completely, then decide how you’ll use them: mashed, pureed, cubed finger food, or mixed into bakes.
- Portion into toddler-friendly sizes before freezing: about 1/4 cup (60 ml) for little ones and 1/2 cup for older toddlers. Use ice cube trays or silicone muffin tins for small portions, then pop frozen blocks into labelled freezer bags laid flat.
Pumpkin pear puree
- 2 cups roasted pumpkin, 2 ripe pears peeled and cooked. Blend with a pinch of cinnamon and a splash of water, formula or breastmilk to reach the texture you want.
- Use as breakfast with yoghurt and oats, spoon into muffins, or thin slightly as a dipping sauce for toast fingers.
- Freeze in 60 ml portions for easy defrosting.
Sweet potato mash with pear
- 2 cups roasted sweet potato, 1 cooked pear, mashed together. Add a little olive oil or mashed avocado for healthy fats.
- Great folded through cooked quinoa, mixed with flaked fish or soft shredded chicken. Also lovely warmed and served with steamed broccoli florets cut into toddler-safe sizes.
Pumpkin and pear breakfast muffins
- 1 cup pumpkin puree, 1/2 cup pear puree, 2 eggs, 1 cup rolled oats, 1 tsp baking powder, 1 tsp cinnamon. Blend, spoon into a 12-hole muffin tray and bake at 180°C for 20 to 25 minutes.
- These freeze and reheat in a minute in the microwave or on a low oven tray. Perfect for school lunchboxes or quick arvo snacks.
Sweet potato and apple patties
- 2 cups mashed sweet potato, 1 grated apple, 1 egg, 1/3 cup flour (oat or regular), tiny pinch of cinnamon. Mix, form small patties and pan-fry in a little oil until golden, or bake on a lined tray at 200°C for 15 to 20 minutes.
- Cool then freeze flat. Reheat from frozen in a toaster oven or on a pan until hot right through.
Savoury pumpkin pikelets
- 1 cup pumpkin puree, 1 egg, 1/2 cup milk, 3/4 cup flour, a small handful of grated cheese and sweet corn if using. Cook spoonfuls on a non-stick pan until set and golden.
- Serve warm with a smear of avocado or cottage cheese.
Texture and progression tips
- Smooth purees for first foods, then gradually add thicker lumps as they get more confident with chewing. By about 9 to 12 months, start serving mashed but lumpy. From 12 months, offer roast cubes and patties as finger food.
- If you need to thin purees, use breastmilk, formula or full-fat yoghurt rather than water for extra calories and creaminess.
Seasoning and flavour ideas
- Keep it mild. A dusting of cinnamon, a pinch of nutmeg, a whisper of mild curry powder or some ground cumin works well. Avoid added salt and skip honey for under 12 months.
- Mix pumpkin with tomato paste, a little garlic and soft beans for a savoury mash, or pair sweet potato with mashed banana and cinnamon for a sweeter option.
Freezing and storage pointers
- Fridge: cooked portions are best used within 48 to 72 hours. If you plan to keep something for a few days, store in airtight containers and label with date.
- Freezer: roasted veg and purees freeze well for up to three months. Label bags with contents and date, and keep portions small so you only defrost what you need.
- Thawing: move frozen blocks to the fridge overnight, or reheat gently from frozen in a pot, microwave or oven. Stir and check temperature, especially for little mouths.
Safety checks
- Make sure chunks are very soft and cut into small pieces to avoid choking. Remove tough skins if they stay leathery after cooking.
- Always cool food to a safe temperature before feeding. No honey until after 12 months.
Quick meal combos to try
- Pumpkin puree + Greek yoghurt + oats for breakfast.
- Sweet potato patties + steamed peas for dinner.
- Pear puree mixed into porridge with a pinch of cinnamon for a fast brekkie.
- Roast cubes warmed and tossed with cooked lentils and a drizzle of olive oil for a simple protein-packed meal.
A little batch-cook session with these three ingredients goes a long way. Roast a couple of trays, puree a few jars, freeze small portions, and you’ll have easy, nutritious wins ready when life gets hectic.
Give them small, simple jobs that actually help, and keep things safe and quick so the whole thing doesn’t turn into a meltdown.
Practical jobs by age and how to set them up
- 12-24 months: sensory, safe and short
- Rinse pear halves or veggies in a colander while you hold them steady. Little hands love the running water.
- Drop pre-cut chunks into a bowl or the compost bucket.
- Press sponge or cloth over a low bench to “help” wipe spills.
-
Use a plastic spoon to scoop cooked mash into silicone moulds or an ice cube tray.
- 2-3 years: more responsibility, still supervised
- Stir mashed sweet potato, pumpkin or pear purée with a big spoon.
- Tear soft herbs or baby spinach and scatter over roasted veg.
- Push seeds out of pumpkin halves (give them a small bowl for the guts) or sort seeds for roasting.
-
Press lids on tubs and help stack them for the freezer.
- 3-5 years: real helpers
- Measure scoops of mash into labelled freezer bags and help press out air before sealing.
- Use a kid-safe knife to cut soft, cooked veggies or soft fruit.
- Decorate portion pots with stickers for quick IDs: “breakfast”, “dinner”, or date stickers.
- Arrange trays of roasted veg or cookie-cutter shapes of pumpkin on a baking paper-lined tray ready for you to pop in the oven.
Set the space up so it works for them
- Low stool or kitchen helper help them reach safely.
- Child-size apron, a damp tea towel and a small bowl for scraps to keep things tidy.
- Pre-measure and pre-cook anything near heat or knives so their job is simple chopping, stirring or packing.
- Use clear, shallow bowls and contrasting coloured spoons so they can see what they’re doing.
Safety and quick rules that save stress
- No little hands near hot trays or pans. Give them an oven-free job while you handle the hot stuff.
- Keep sharp knives out of reach; if they’re practising cutting, use a toddler-safe knife and soft, cooked pieces.
- Teach handwashing before and after, and have a wet wipe handy for instant cleanups.
- One job at a time. A tidy, short task is far better than a long list that loses their attention.
Make it fun and useful
- Turn counting into a job: count pumpkin seeds, scoops of mash or freezer portions.
- Give simple choices: “Do you want blueberry sticker or star sticker?” That feels like ownership and keeps them engaged.
- Sing a short two-line song while you work or set a 3-minute timer for rapid jobs to make it a game.
Packing and labelling with kids
- Let them press labels or stickers on freezer bags after you write the date.
- Have them pop lids on tubs, then you check the seal. Little wins like this build confidence and speed up prep.
Keep expectations low and praise high. They won’t be perfect helpers yet, but even ten minutes of real kitchen jobs builds skills, saves you tiny bits of time and makes meal prep a lot more fun.
Match those little helpers and your batch-cooked stash to a quilt-style plan and the week suddenly runs itself. The idea is dead simple: break your meals into repeatable squares, mix textures and flavours, and rotate. Here’s how to turn that into a practical plan you’ll actually use.
- Set up a simple grid
- Pick a size that suits you. A 4x4 grid works great for a month, a 2x3 is perfect for two weeks. Columns can be meal types like breakfast, lunch, dinner, snack, or nights of the week if you prefer.
- Write the meal idea for each square. Keep one column or row for “mix-in” extras such as grated cheese, mashed avocado or quick proteins to boost variety.
- Choose your quilt squares (recipe ideas)
- Pumpkin soup, smooth or chunky depending on age.
- Pumpkin and lentil ragu for spoonable dinners.
- Roast pumpkin cubes as finger food.
- Pumpkin muffins or savoury loaf slices for snacks.
- Pear compote for breakfasts or yogurt toppers.
- Pear pancakes or folded into porridge.
- Pear smoothies or frozen cubes for teething.
- Sweet potato mash, plain or with a little butter.
- Sweet potato wedges for dipping.
- Sweet potato and carrot fritters.
- Mixed veg puree with pumpkin and sweet potato for younger toddlers. Aim for different textures across the grid so tastes stay interesting.
- Batch sizes and freezing tips
- Portion toddler servings into ice cube trays or silicone muffin pans. Cubes are about 2 to 4 tablespoons; muffins about 1 to 2 toddler servings each. Freeze, then pop into labelled freezer bags.
- Flattened freezer bags are space savers and defrost quickly. Label with name and date and try to use within three months for best flavour.
- Keep a small set of ready-to-serve items in the fridge for the next two days and the rest in the freezer.
- Make weekly combos
- Use the grid to pull together a week in five minutes. Example week:
- Monday dinner: pumpkin and lentil ragu + sweet potato wedges
- Tuesday lunch: pear compote on porridge + savoury pumpkin muffin for snack
- Wednesday dinner: smooth pumpkin soup + toast soldiers
- Thursday lunch: sweet potato mash + shredded chicken mix-in
- Swap textures often. If Monday is soft puree, aim for a finger-food night Tuesday.
- Shopping and prep schedule
- Build a shopping list from your filled grid so you only buy what you need. Group items by fridge, pantry and freezer to speed the shop.
- A one- or two-hour prep session covers roasting pumpkins and sweet potatoes, blending a couple of purees, and popping muffins in the oven. Do roasting first, cool while you mix batters and puree, portion and freeze at the end.
- If mornings are easier, roast vegetables early, then use the afternoon for portioning.
- Involve the kids
- Let little ones pick a square for the week or stick a magnet on the grid to choose dinner. Matching the jobs they’ve learned to the grid keeps them excited to eat what they helped make.
- Use colours for each food group so toddlers can spot a favourite square, meaning less negotiation at mealtimes.
- Reheating and serving
- Thaw overnight in the fridge for best texture or pop a frozen muffin in the toaster oven. Warm soups gently on the stove and stir well so there are no hot spots.
- Add a splash of milk, yogurt or olive oil after reheating to freshen flavour and texture just before serving.
- Always check temperature before giving food to a toddler.
- FIFO and freshness
- When you refill the freezer, put newer bags behind older ones. Label with date and the meal square name so you can quickly find what you need.
- Keep a running note on the fridge of what’s in the freezer and where. That five-minute check saves food and stress later.
Quilt planning makes repetition feel intentional instead of boring. Once the grid is filled, swapping squares for a couple of evenings is all it takes to keep the week feeling fresh and manageable.

With your quilt plan on the fridge, here’s how to make the freezer actually do the heavy lifting on weeknights.
FIFO basics that actually work
- Label everything with the date and a one-line reheating note. Plain sticky labels and a Sharpie are magic. New tubs go to the back, older tubs to the front.
- Keep portions toddler-sized. Use 1/2 to 1 cup portions for mains and 1/4 to 1/3 cup for sides or snacks. Ice cube trays are perfect for tiny tastes and doubling up later.
- Keep a simple inventory on the freezer door or a notes app: meal name, date frozen, how many portions. Cross items off as you use them.
- Use see-through containers or clear bags so you can eyeball what’s inside without digging. Stack flat bags lying down to save space and avoid freezer burn.
Thawing and reheating made easy
- If you can, shift the meal into the fridge in the morning so it’s thawed by dinner. If not, microwave on defrost or zap in short bursts, stirring in between.
- Reheat until steaming hot, then cool down to lukewarm for toddlers. Stir well to avoid hot spots. Never re-freeze once thawed.
- For soups, stews and saucy meals, reheat on the stove with a splash of water or milk to loosen the consistency for little mouths. For bakes, a low oven for 10-15 minutes brings back the oven-baked goodness.
Containers that make FIFO simple
- Silicone muffin trays and ice cube trays for portioning purees and sauces. Once frozen, pop out and store in labeled bags.
- Small snap-lock containers or 250-500 ml deli tubs for mains. Stackable and easy to grab.
- Reusable pouches for purees and porridge. Great for single-serve, but write dates on them.
Quick freezer-friendly meal ideas (how to freeze and how to reheat)
- Pumpkin and lentil dahl: Freeze in 1-cup portions. Reheat on the stove with a splash of milk or in the microwave. Serve with mashed sweet potato.
- Sweet potato and turkey meatballs: Freeze raw on a tray, then bag once firm. Cook from frozen in a pan with a little sauce or warm through in the oven.
- Pumpkin, spinach and ricotta pasta bake: Cool fully, freeze in individual portions. Oven or microwave to reheat. Add a sprinkle of cheese after heating if you like.
- Pear compote: Freeze in ice cube tray portions for breakfasts or yoghurt toppers. Defrost one cube in the fridge or microwave briefly.
- Sweet potato and carrot mash: Freeze in tubs or muffin tray portions. Reheat with a splash of milk and mash again for smoothness.
- Beef bolognese or lentil ragu: Freeze in meal-sized portions. Reheat on the stove and toss through pasta or spoon over soft rice.
- Veggie fritters: Cook, cool, freeze flat between baking paper, then re-crisp in the oven or under the grill from frozen.
- Oaty banana pancakes or pikelets: Freeze stacked with baking paper in between. Toast or microwave briefly to warm.
Five-night FIFO plan you can steal
- Monday: Defrosted pumpkin dahl with rice. Move tub to fridge in the morning.
- Tuesday: Meatballs from the back of the freezer, warmed in a chunky tomato sauce.
- Wednesday: Reheated veggie fritters with mashed sweet potato and a spoon of pear compote.
- Thursday: Pasta bake portion pulled from the freezer, bung in the oven while you do baths.
- Friday: Leftover rotation night. Anything older than two weeks gets used tonight.
A few safety and quality rules to keep front of mind
- Aim to use frozen cooked meals within three months for best taste. Purees and fruit compotes are fine for 1 to 3 months.
- Thawed meals should be kept in the fridge and used within 24 to 48 hours.
- Reheat only once. If your toddler doesn’t finish, bin it or refrigerate for an adult meal later.
Quick freezer checklist before you shut the lid
- Cool food completely before freezing.
- Label with meal name, date and quick reheating note.
- Put newest meals at the back. Front shelf equals tonight and tomorrow.
- Update the inventory and plan your fridge defrosts in the morning if needed.
Do a tiny prep slot on Sundays or after bedtime and your weeknight life will be so much easier. Pop a new batch in the back after each cook and watch the FIFO system save your evenings.
Photo credit: Pexels
Browse Cuisines
From the Blog
Cyber Dad’s Quick Roasts
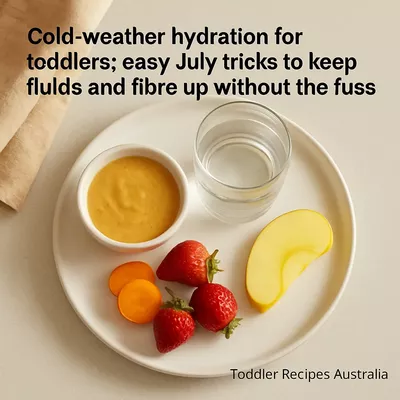
Just a couple of cosy, no-fuss tricks I reach for when the weather makes everyone want to hibernate. Easy swaps and tiny rituals keep sips coming and a bit of fibre tucked in without a meltdown.
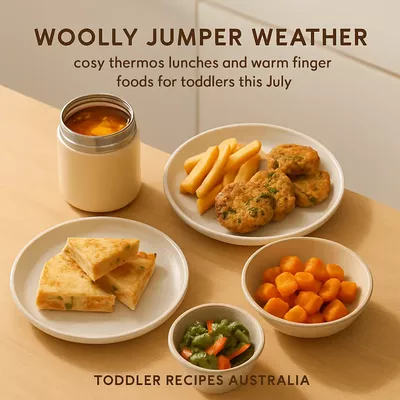
If you want a hot lunch that actually stays hot by pickup time, Steve has a handful of simple tricks that save the day. They’re quick, practical and have rescued many soggy pasta afternoons.

 Never miss a recipe from us, subscribe to our newsletter