
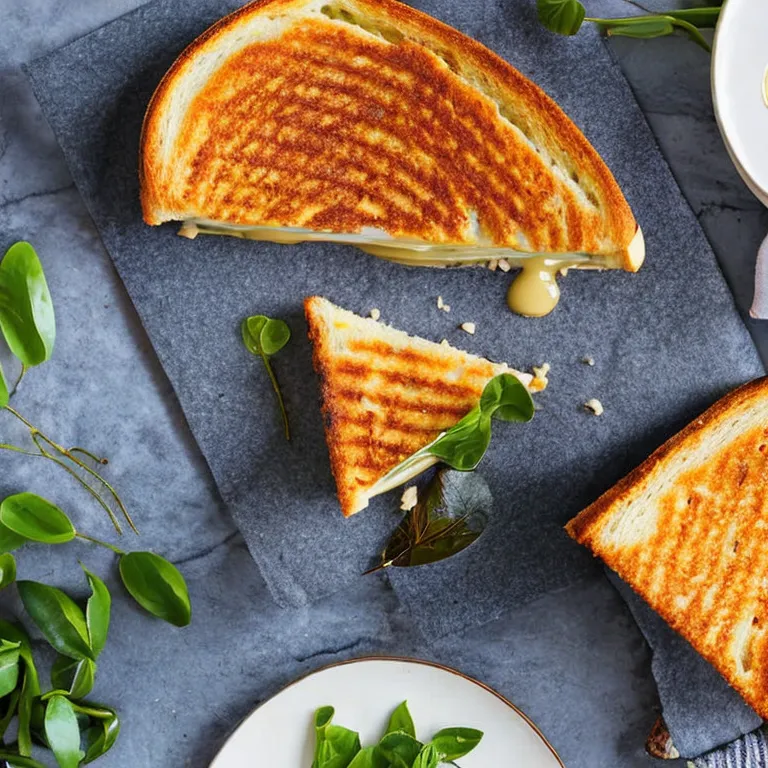
Grilled Cheese Sandwich is a classic comfort food that the whole family will love - perfect for quick lunches, easy dinners or any time you want something warm and satisfying; made with melted cheese between slices of golden-grilled bread, this wholesome version is toddler-friendly with no added salt, soft and easy to eat, great for baby-led weaning and can be adapted to add vegetables like tomato or avocado, made with different cheeses for variety, or kept very simple with just bread and cheese for fussier eaters; follow this simple recipe for a timeless favourite that introduces your child to comfort food classics while keeping everything nutritious, safe and utterly delicious.
General Information
- Servings: 4 toddler-sized sandwiches
- Keywords: grilled cheese, toddler, no salt, low-sodium, family, easy, sandwich
- Calories: ~300 kcal per sandwich (approximate)
- Protein: ~12 g per sandwich (approximate)
- Carbs: ~30 g per sandwich (approximate)
- Fats: ~16 g per sandwich (approximate)
- Preparation time: 10 minutes
- Cooking time: 8 minutes
G’day, I’m Steve - an account manager by day and dad of two by night. I love quick, no-fuss recipes that are safe for little ones and still tasty for grown-ups. This grilled cheese keeps things simple, with no added salt or sugar, and all pieces cut to toddler-friendly sizes.
Ingredients
- 8 slices wholemeal bread (about 480 g total, or 2 slices per sandwich)
- 160 g fresh mozzarella or low-sodium mozzarella, grated or very thinly sliced (about 40 g per sandwich)
- 30 g unsalted butter, softened, or 30 mL extra virgin olive oil (for cooking)
- 1 medium zucchini (about 150 g)
- 1 medium carrot (about 80 g)
- 30 mL full-fat milk (optional, helps cheese melt; can leave out)
- 1 small ripe avocado (optional, for spreading or dipping)
- Unsweetened full-fat plain yogurt, for serving (optional)
Notes on safety and ingredients:
- Avoid cheeses labeled high-sodium. Fresh mozzarella or a low-sodium melting cheese is best.
- No added salt or sugar in any ingredient.
- All solid ingredients will be cut or shredded to sizes that reduce choking risk. Always watch toddlers while they eat.
Directions
I’ll walk you through each step like I’m talking a mate through the phone while juggling a toddler on my hip. Slow and steady, and stop if you need to.
- Prepare your workspace and tools
- Clean a chopping board, a small grater, a small frying pan (20-24 cm), a spatula, a knife, a teaspoon, and a plate.
- Sit the kids somewhere safe and entertained. If you’ve got an assistant (a curious toddler), give them a wooden spoon to investigate from a safe distance.
- Wash and prepare the zucchini and carrot
- Rinse the zucchini and carrot under cold running water.
- Trim off both ends of the zucchini (about 1 cm off each end) and peel the carrot if the skin is thick.
- Using the coarse side of a grater, grate the zucchini and carrot into a bowl. Grating makes them soft and less of a choking hazard.
- Gently squeeze the grated zucchini in a clean tea towel or paper towel to remove excess moisture. You only need to press lightly, enough so the filling does not make the bread soggy.
- Lightly cook the veggies to soften
- Heat a small non-stick frying pan over low to medium-low heat. If you are using butter, put half the butter (about 15 g) in the pan and let it melt slowly. If using olive oil, pour about 15 mL into the pan.
- Add the grated carrot and zucchini to the pan. Stir for 2-3 minutes until they have softened. If they look dry, add a tablespoon (15 mL) of water and cover for 1 minute.
- Remove from heat and let the veggies cool for a couple of minutes. Cool filling is safer for toddlers.
Joke break: If your little one tries to sample the cooked zucchini now, blame me. Or share a tiny safe taste if you trust them.
- Prepare the cheese
- If your mozzarella is in a ball, pat it dry with a paper towel and then either grate it or slice it very thinly. Thin slices or small shreds melt faster and are safer for tiny mouths.
- Measure about 40 g of cheese per sandwich. If you have a kitchen scale, that’s perfect. If not, aim for a handful of grated cheese for each sandwich.
- Assemble the sandwiches
- Lay out 4 slices of bread on the board.
- If using avocado: mash the avocado with a fork until smooth, then spread a thin layer (about 1 tablespoon, 15 g) over the bread. This adds creaminess without salt.
- Spoon an even layer of the cooled, cooked grated veggies onto each slice, spreading them thinly so the sandwich is easy to chew.
- Add the cheese on top of the veggies. Aim for a thin even layer so it melts well.
- Top with the remaining 4 slices of bread. Press gently so the filling holds together.
- Prepare the pan for toasting
- Put the frying pan back on low heat. Add the remaining half of the butter or about 15 mL olive oil and let it warm slowly. Low heat is key. We do not want burnt bread and unmelted cheese.
- Cook the sandwiches
- Place one or two sandwiches in the pan, depending on size. Cook on low for about 3-4 minutes on the first side. Then gently lift the sandwich with a spatula and check the underside. It should be golden, not dark brown.
- Flip carefully, press lightly with the spatula, and cook another 3-4 minutes. If the cheese is not fully melted after 4 minutes on the second side, lower the heat and put a lid on the pan for 1 minute. The trapped steam helps melt the cheese without burning the bread.
- Repeat with remaining sandwiches.
Safety tip: Keep the cooked sandwiches on a plate and let them cool 1-2 minutes before cutting. Hot cheese can burn little mouths.
- Cut to toddler-friendly sizes
- Remove the crusts if you prefer. For toddlers, I cut each sandwich into thin strips about 1 cm to 1.5 cm wide and 6-8 cm long. Strips are easier for small hands and reduce choking risk.
- Alternatively, cut into small triangles about 3 cm across and then into smaller pieces if needed. Always watch your child while they eat.
- Serve
- Place the strips or small pieces on a plate with a small bowl of unsweetened yogurt or mashed avocado for dipping. Add soft steamed vegetable pieces or very ripe banana slices cut into small pieces if desired.
Final tip from a tired dad: keep the heat low and have a napkin nearby. And practice: toddlers often prefer the first one they taste, no matter how burnt the rest are.
Recommended Sides
- Unsweetened full-fat plain yogurt, 1 small pot for dipping
- Ripe avocado, mashed and served in a small bowl
- Steamed sweet potato cubes, soft and cooled, cut into small pieces (about 1 cm)
- Soft pear or banana pieces, cut into very small, flat slices
- Soft-cooked peas or mashed peas, spoonable
Jokes
- Why did the sandwich go to school? To get a little “bread-ucation.”
- If your toddler insists the sandwich is a hat, let them wear it for one minute. Superhero dinners are a parenting win.
- When my daughter eats grilled cheese, I call it a “melt-down meeting” at the kitchen table.
If you want, I can suggest variations with different low-sodium cheeses or ways to add protein while keeping everything toddler-safe.
Shop Ingredients
Find these ingredients on Amazon:
As an Amazon Associate I earn from qualifying purchases.
Suggested Recipes

 Never miss a recipe from us, subscribe to our newsletter